Development
Development
This guide is intended for those interested in Graphic Data development. It provides an on-ramp for setting up the environment that you will need to be involved with Graphic Data development in a WordPress environment that is installed locally.
This guide is written assuming that Local, Visual Studio Code, and GitHub Desktop will be used (and assumes a working knowledge of all three, as well as knowledge of using the WordPress admin dashboard).
- Install Local.
- Install Visual Studio Code.
- Install and activate PHP Debug Extension for VS Code.
- Install GitHub Desktop.
- Install the JetBrains XDebug extension for your browser.
- Create a new Wordpress site in the Local app by hitting the plus sign in lower left and using the default options. For the purposes of this example, the site is called may26 and is located at the following path:
C:\\Users\\jai\\Local Sites\\may26 - Turn on the debug log for your Wordpress installation, by doing the following.
- In Visual Studio Code, open the file wp-config.php, which is located in the root directory for the wordpress installation. In this example’s case, the directory where wp-config.php is located is:
C:\\Users\\jai\\Local Sites\\may26\\app\\public - Delete the debug-related code in the wp-config.php file, which at the time of writing is located on lines 90-92 and consists of the following:
1
2
3
 if ( ! defined( 'WP_DEBUG' ) ) {
     define( 'WP_DEBUG', false );
     }
- In Visual Studio Code, open the file wp-config.php, which is located in the root directory for the wordpress installation. In this example’s case, the directory where wp-config.php is located is:
- Replace the deleted lines above with the following lines, which come from the Wordpress Developer’s Guide, and then save the wp-config file:
1
2
3
4
5
6
7
 // Enable WP_DEBUG mode
 define( 'WP_DEBUG', true );
 // Enable Debug logging to /wp-content/debug.log file
 define( 'WP_DEBUG_LOG', true );
 // Disable display of errors and warnings
 define( 'WP_DEBUG_DISPLAY', false );
 @ini_set( 'display_errors', 0 );
- In your Wordpress installation, delete all themes other than the current theme. At the time of writing, the current default theme is Twenty Twenty Five.
- Create a new folder called “old wp content” somewhere other than the Wordpress locations. In “old wp content”, copy over the contents of the Wordpress wp-content directory. In this example’s case, the location of that directory is:
C:\\Users\\jai\\Local Sites\\may26\\app\\public\\wp-content - Delete the contents of the wp-content directory, but don’t delete the directory itself.
- Note: there may be hidden files within the directory that also need to be removed. For example, if you’re on a Mac, there will be a .DS_Store hidden file that needs to be removed.
- To see if there are hidden files that need to be removed, one way to do that would be to open a terminal window and go to the wp-content directory. If you type the command
ls-la, you will see all files in the directory, including the hidden files. - Type
rm \<filename\>in the terminal to knock out any remaining files.
- Now that you have modified the default Wordpress file and folder structure it is time to get the custom plugin code. Clone the Sanctuary Watch repo to your computer using GitHub Desktop. Save the repo into the wp-content/ directory. GitHub Desktop will attempt to save the directory as wp-content/sanctuarywatch - but that is not what you want. Save the directory into just wp-content/
- To do this, navigate to the wp-content directory in the terminal and use the following command (note that the period at the end is important):
git clone \<whatever link.git\> .
- To do this, navigate to the wp-content directory in the terminal and use the following command (note that the period at the end is important):
- From “old wp content”, copy the themes/twentytwentyfive and uploads/ folders back into the wp-content/ folder. If a theme other than twenty twenty five is the current theme, copy that theme folder instead.
- Delete the “old wp content” folder.
- Get Xdebug configured properly in this Wordpress installation, by doing the following. In Visual Studio Code open the Wordpress installation’s php.ini.hbs file. This file is located under your site’s conf/php/ directory. In our example, it can be found at:
C:\\Users\\jai\\Local Sites\\may26\\conf\\php\\-
Delete the Xdebug-related lines in the file, which at the time of writing consisted of the following at lines 227-241:
1
2
3
4
5
6
7
8
9
10
11
12
13
14
15
 [xdebug]
 {{#if os.windows}}
 zend_extension = php_xdebug.dll
 {{else}}
 zend_extension = {{extensionsDir}}/xdebug.so
 {{/if}}

 {{#if xdebugEnabled}}
 xdebug.mode=debug,develop
 {{else}}
 xdebug.mode=off
 {{/if}}
 xdebug.client_port=9000
 xdebug.start_with_request=yes
 xdebug.discover_client_host=yes
-
-
Replace the deleted lines, with the following, which comes from this resource:
1 2 3 4 5 6 7 8 9 10 11 12 13 14 15 16
[xdebug] {{#if os.windows}} zend_extension = php_xdebug.dll {{else}} zend_extension = {{extensionsDir}}/xdebug.so {{/if}} {{#if xdebugEnabled}} xdebug.mode=debug ; xdebug.mode=debug,develop {{else}} xdebug.mode=off {{/if}} xdebug.client_port="9000" ; xdebug.start_with_request=yes xdebug.discover_client_host=yes - Navigate to the WordPress admin interface of your new site.
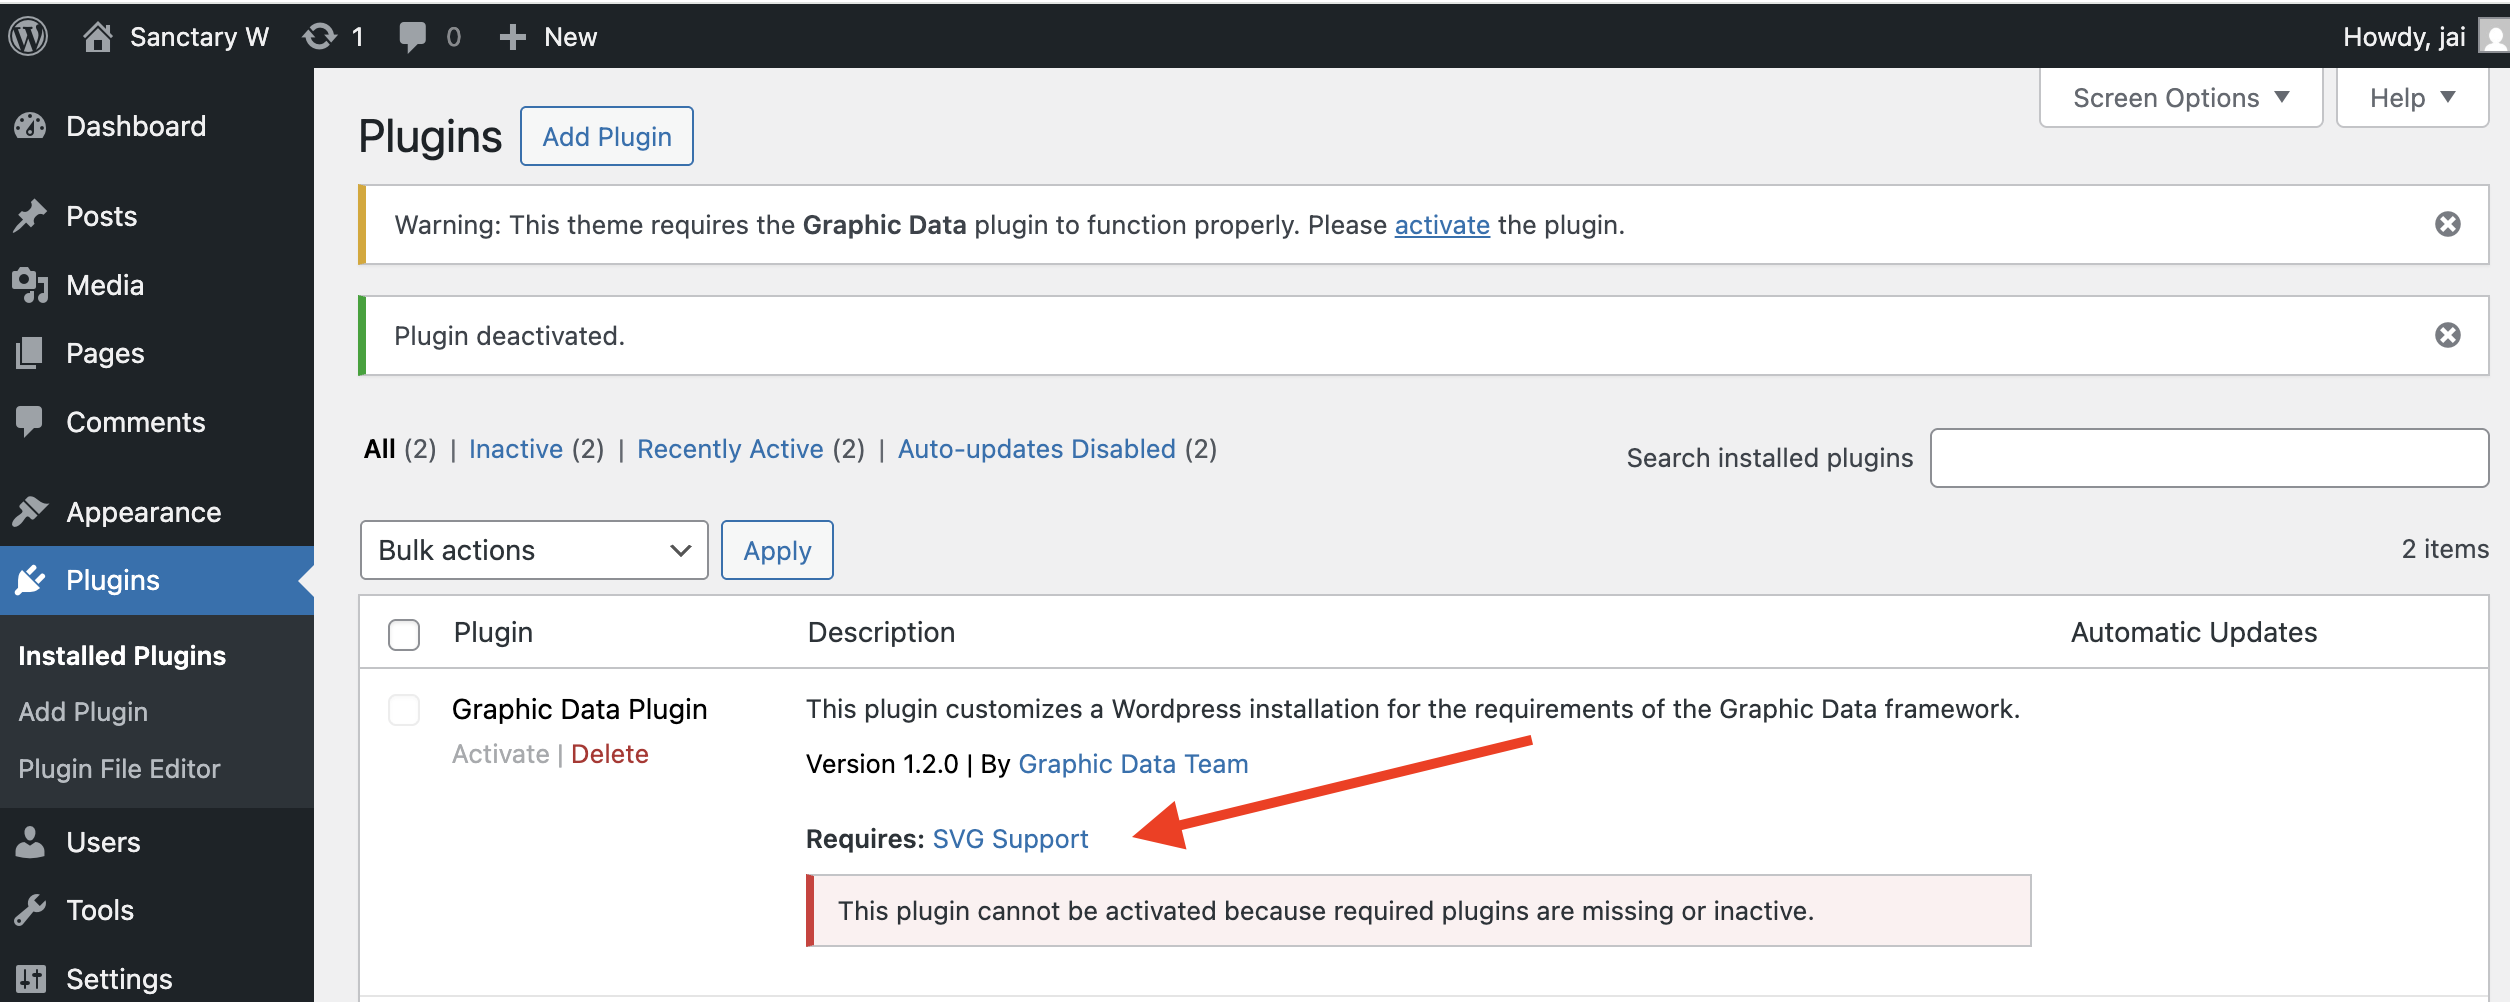
- The new Graphic Data plugin depends on the Svg Support plugin being installed before it can be activated. You can install and activate Svg Support by clicking the associated link in the Wordpress Admin Plugins window (see image below). Note that, in the window that opens when you click the link, the Install and Activate buttons are in the lower right (and easy to miss).
- Activate the Graphic Data plugin.
- Activate the Graphic Data theme.
- Install PHP Code Sniffer within Visual Studio Code (which evaluates PHP files to see if they match coding standards).
- Install PHP_CodeSniffer on your computer.
- Install and enable the PHP_CodeSniffer Visual Studio Code extension.
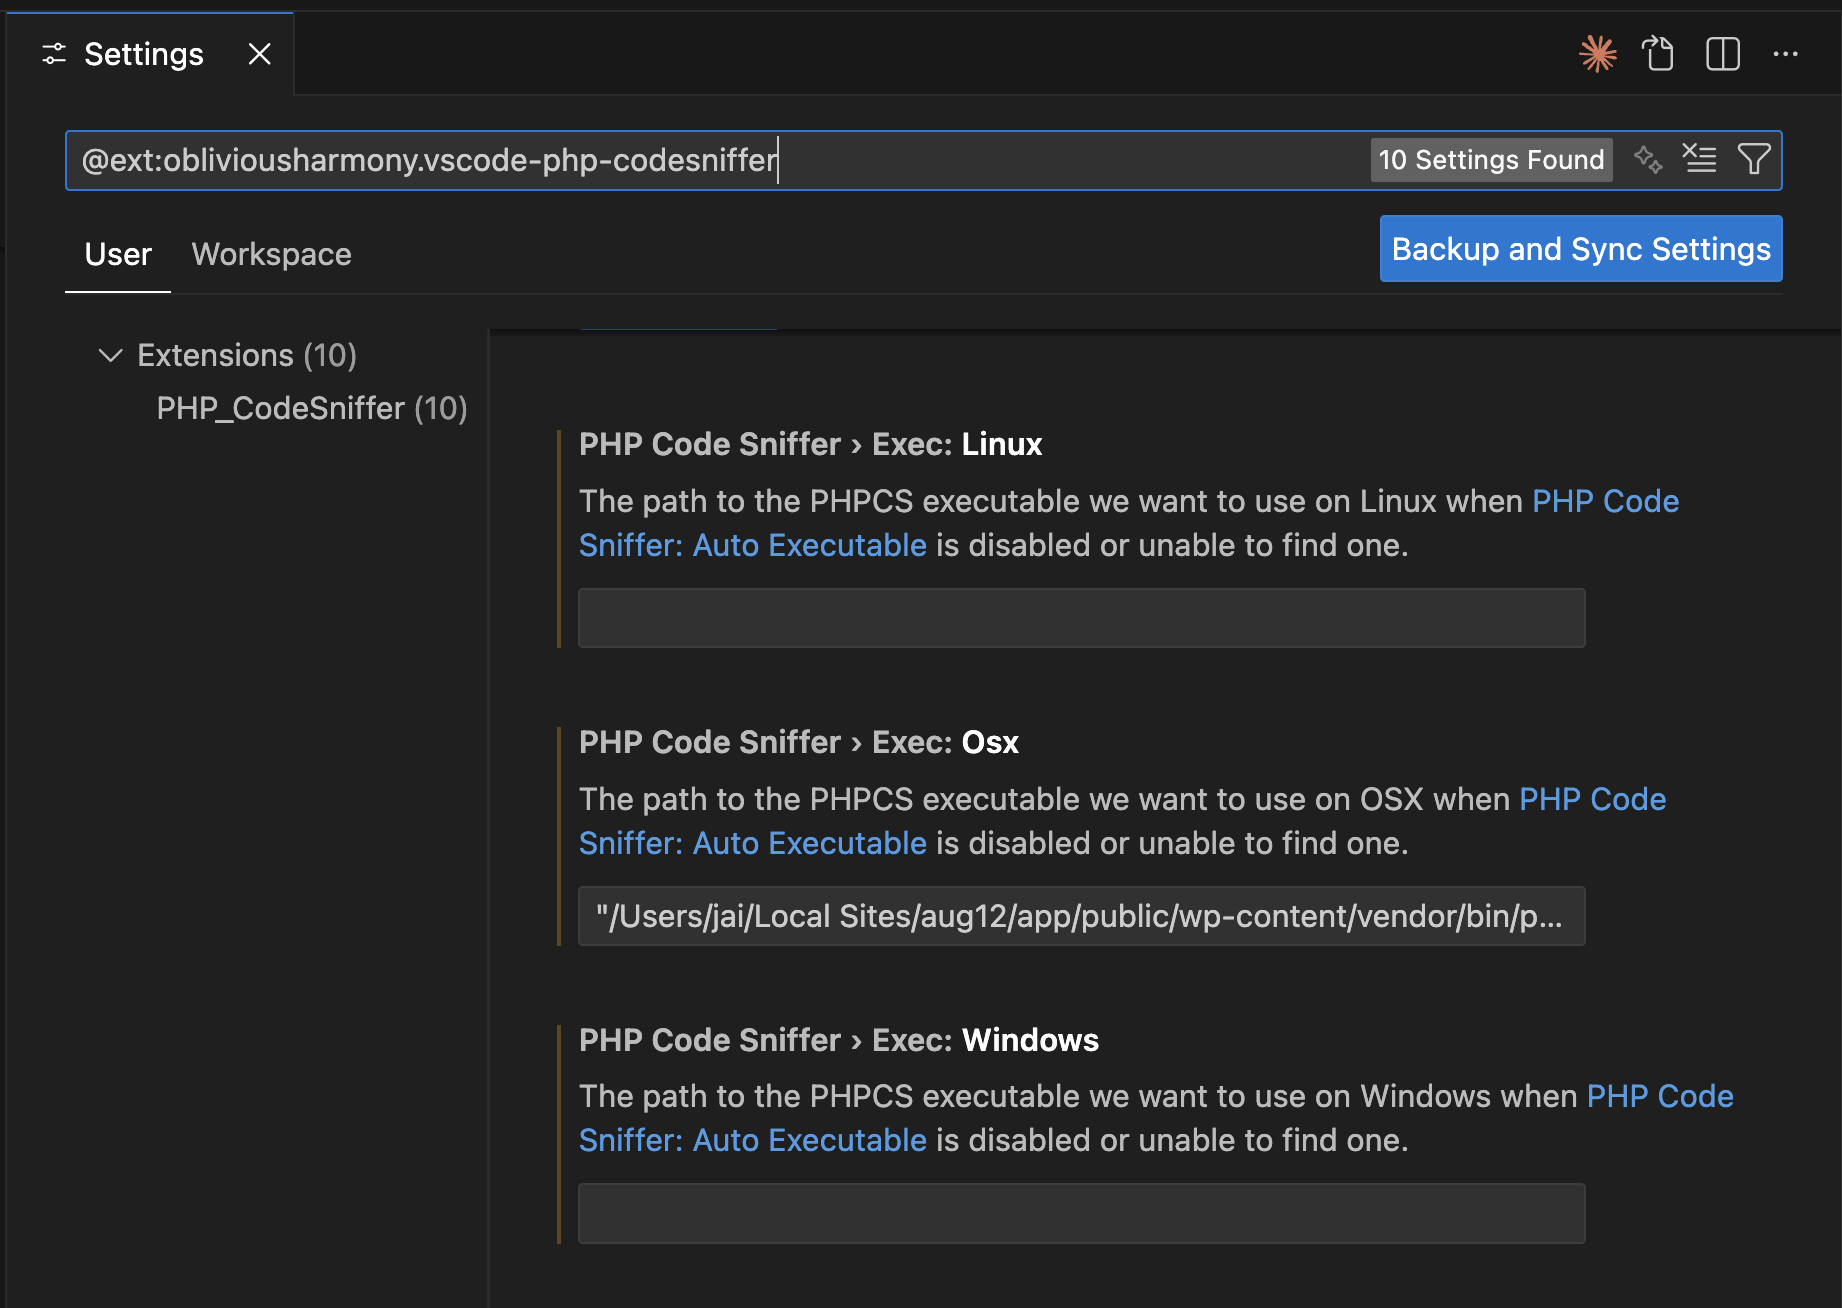
- In order for the extension to work, several configuration settings must first be set in the extension’s Settings:
- For the field Exec: Linux, Exec: Osx, or Exec: Windows (depending on the operating system you are running), enter the path to the PHPCS executable file that you installed on your computer in part a (see example below).
- For the field Standard, set the value to Custom.
- For the field Standard Custom, set the value to the path of the phpcs.xml.dist file located in the root directory of the GitHub repo that you cloned onto your computer in Step 11 of these instructions. For example, in the case of the writer of these instructions, that path would be: “/Users/jairanganathan/Local Sites/jun24/app/public/wp-content/phpcs.xml.dist”. Note the use of quotation marks, which is necessary due to the fact that “Local Sites” in the path contains a space.
- For the field Exec: Linux, Exec: Osx, or Exec: Windows (depending on the operating system you are running), enter the path to the PHPCS executable file that you installed on your computer in part a (see example below).
- Install PHPStan within Visual Studio Code (which acts as a static code analyzer for PHP files).
1. Install and enable the Visual Studio Code extension for PHPStan.
2. In the terminal, navigate to the root directory of the repository.
3. In the terminal, install PHPstan by running the following command (which assumes that composer is already installed):composer require phpstan/phpstan \--dev
4. There already is a configuration file within the root directory for PHPstan (so you don’t have to supply one). - Install ESLint within Visual Studio Code (which acts as a linter for Javascript files).
- Install and enable the Visual Studio Code ESLint extension.
- In the terminal, navigate to the root directory of the repository.
- In the terminal, install ESLint within the root directory by running the following command (which assumes that npm is already installed):
npm install \--save-dev eslint - There already is a configuration file within the root directory for ESLint (so you don’t have to supply one).